View
반응형
[ Webpack 시리즈 ]
프로젝트 환경설정
이전 포스팅의 마무리 느낌으로 바닐라 자바스크립트 기반의 개발환경을 세팅해보자! 👊
1. 프로젝트 버전관리
npm init -y
2. .gitignore 파일 생성 및 설정
# dependencies
/node_modules

# production
/dist

# etc
.DS_Store
.vscode
.gitignore 파일에는 git으로 추적하지 않을 파일들을 적는다.
3. webpack 설정
npm i -D webpack webpack-cli webpack-dev-server html-webpack-plugin copy-webpack-plugin- webpack : 실제 기능을 담당하는 패키지
- webpack-cli : cmd 환경에서 webpack을 사용할 수 있도록 도와주는 패키지
- webpack-dev-server : 개발 서버를 열 수 있는 패키지
- html-webpack-plugin : html 기본 템플릿을 만들어주는 패키지
- copy-webpack-plugin : static 요소를 dist 디렉토리로 복사해주는 패키지
package.json 파일 수정
// package.json
...
{
	"scripts": {
    	"build": "webpack --mode production",
        "dev": "webpack-dev-server --mode development --open"
    }
}
webpack.config.js 파일 생성 및 설정
const path = require('path');
const HtmlPlugin = require('html-webpack-plugin');
const CopyPlugin = require('copy-webpack-plugin');

module.exports = {
    entry: './src/main.js',
    output: {
        path: path.resolve(__dirname, 'dist'),
        filename: 'js/bundle.js',
        clean: true,
    },
    module: {
        rules: [
            {
                test: /\.(png|jpg|gif)$/i,
                type: 'asset/resource',
                generator: {
                    filename: 'assets/images/[name][ext]',
                },
            },
        ],
    },
    devtool: 'inline-source-map',
    devServer: {
        client: {
            logging: 'none',
        },
    },
    plugins: [
        new HtmlPlugin({
            template: './public/index.html',
            favicon: path.resolve(__dirname, 'public/favicon.ico'),
        }),
        new CopyPlugin({
            patterns: [{ from: 'public/favicon.ico' }],
        }),
    ],
};
4. SCSS , webpack 관련 패키지 설정
npm i -D sass sass-loader css-loader mini-css-extract-plugin- mini-css-extract-plugin : css파일을 따로 추출해주는 패키지
webpack.config.js 파일 수정
설치한 패키지를 추가해준다.
const MiniCssExtractPlugin = require('mini-css-extract-plugin')

module.exports = {
  module: {
    rules: [
    ...
      {
        test: /\.s[ac]ss$/i,
        use: [MiniCssExtractPlugin.loader, 'css-loader', 'sass-loader'],
        exclude: /node_modules/
      }
    ]
  },
  plugins: [
  ...
    new MiniCssExtractPlugin({
      filename: 'assets/css/style.[contenthash].css',
    })
  ]
}
5. babel, webpack 관련 패키지 설정
npm i -D @babel/core @babel/preset-env babel-loader @babel/plugin-proposal-class-properties- @babel/core
- @babel/preset-env : 이전 브라우저들을 지원 (ES6+ 코드들을 지원해준다)
- babel-loader : 바벨이랑 웹팩이랑 연결
- @babel/plugin-proposal-class-properties : 클래스 속성을 변환하는 플러그인
webpack.package.json 파일 수정
module.exports = {
  module: {
    rules: [
    ...
      {
      	test: /\.m?js$/,
        include: [path.resolve(__dirname, 'src')],
        exclude: /node_modules/,
        use: {
        	loader: 'babel-loader',
            options: {
            	presets: [
                	["@babel/preset-env", {
                    	"useBuiltIns": "usage",
                        "corejs": 3
                    }],
                ],
            plugins: ["@babel/plugin-proposal-class-properties"]
          }
        }
      }
    ]
  }
}
6. eslint, prettier 설치 및 설정
npm i -D prettier eslint-plugin-prettier eslint-config-prettier eslint-plugin-import
eslint 설치
npx eslint --init
You can also run this command directly using 'npm init @eslint/config'.
Need to install the following packages:
  @eslint/create-config
Ok to proceed? (y) y
✔ How would you like to use ESLint? · style
✔ What type of modules does your project use? · commonjs
✔ Which framework does your project use? · none
✔ Does your project use TypeScript? · No
✔ Where does your code run? · browser
✔ How would you like to define a style for your project? · guide
✔ Which style guide do you want to follow? · airbnb
✔ What format do you want your config file to be in? · JavaScript
✔ Would you like to install them now? · Yes
✔ Which package manager do you want to use? · npm
본인이 원하는 설정으로 세팅 마무리
이 명령어를 수행하고 나면 자동적으로 eslintrc 파일이 생성된다.
위에서는 모듈 방식을 commonjs를 선택했지만 esm방식으로 바꿔줄 것이다.
.eslintrc.js 파일 설정
module.exports = {
  env: {
    browser: true,
    es2021: true
  },
  extends: 'eslint:recommended',  //airbnb 수정했습니다.
  plugin: 'import',
  overrides: [],
  parserOptions: {
    ecmaVersion: 'latest',
    sourceType: 'module'
  },
  rules: {}
};
import, export 방식을 사용하기 위해 sourceType을 추가해준다.
.prettierrc.json 파일 생성 및 설정
{
  "printWidth": 80,
  "tabWidth": 2,
  "useTabs": false,
  "semi": true,
  "singleQuote": true,
  "quoteProps": "as-needed",
  "jsxSingleQuote": false,
  "trailingComma": "none",
  "bracketSpacing": true,
  "bracketSameLine": true,
  "arrowParens": "always",
  "endOfLine": "auto"
}
이 설정 또한 프로젝트에 맞게 세팅해준다.
7. commonJS -> ES module 방식으로 바꿔주기
package.json 파일 수정
{
  "type": "module",
...
}
파일 안에 type을 명시해준다.
eslintrc.json 파일명 수정 및 포맷 수정
{
  "env": {
    "browser": true,
    "es2021": true
  },
  "extends": ["eslint:recommended"],
  "plugin": "import",
  "overrides": [],
  "parserOptions": {
    "ecmaVersion": "latest",
    "sourceType": "module"
  },
  "rules": {}
}
module.exports 구문을 사용하지 않으므로 파일명을 json으로 변경 후 json 포맷으로 작성한다.
webpack.config.js 파일 포맷 수정
import { resolve } from 'path';
import HtmlPlugin from 'html-webpack-plugin';
import CopyPlugin from 'copy-webpack-plugin';
import MiniCssExtractPlugin, {loader as _loader} from 'mini-css-extract-plugin';
import path from 'path';
const __dirname = path.resolve();

export const entry = './src/main.js';
export const output = {
  path: resolve(__dirname, 'dist'),
  filename: 'js/bundle.js',
  clean: true
};
export const module = {
  rules: [
    {
      test: /\.(png|jpg|gif)$/i,
      type: 'asset/resource',
      generator: {
        filename: 'assets/images/[name][ext]'
      }
    },
    {
      test: /\.s[ac]ss$/i,
      use: [_loader, 'css-loader', 'sass-loader'],
      exclude: /node_modules/
    },
    {
      test: /\.m?js$/,
      include: [resolve(__dirname, 'src')],
      exclude: /node_modules/,
      use: {
        loader: 'babel-loader',
        options: {
          presets: [
            [
              '@babel/preset-env',
              {
                useBuiltIns: 'usage',
                corejs: 3
              }
            ]
          ],
          plugins: ['@babel/plugin-proposal-class-properties']
        }
      }
    }
  ]
};
export const devtool = 'inline-source-map';
export const devServer = {
  client: {
    logging: 'none'
  }
};
export const plugins = [
  new HtmlPlugin({
    template: './public/index.html',
    favicon: resolve(__dirname, 'public/favicon.ico')
  }),
  new CopyPlugin({
    patterns: [{ from: 'public/favicon.ico' }]
  }),
  new MiniCssExtractPlugin({
    filename: 'assets/css/style.[contenthash].css'
  })
];
js 파일은 import, export 구문으로 변경해서 작성한다.
이때 __dirname 은 더 이상 사용하지 않는데 이는 따로 변수로 선언해서 사용한다.
import path from 'path';
const __dirname = path.resolve();
8. 잘 동작하는지 확인 하기
잘 동작하는지 확인하기 위해 src 기초 폴더 구조를 만든다.
├── public
│   ├── favicon.ico
│   ├── index.html
│   └── main.js
├── src
│   ├── App.js
│   └── main.js
├── eslintre.json
├── .gitignore
├── prettierrc.json
├── package.json
├── package-rock.json
└── webpack.config.js
/src/main.js 파일 설정
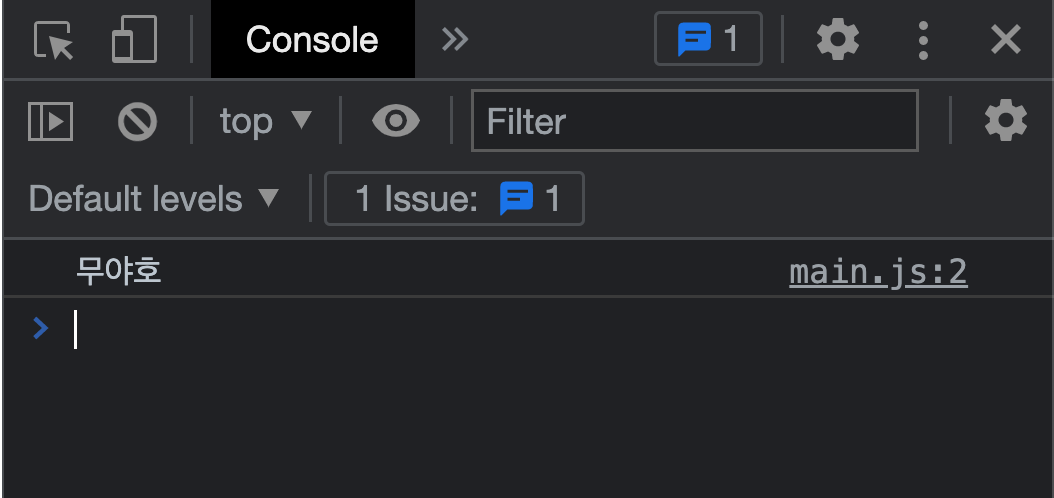
export const test = '무야호';
console.log(test);
개발 서버 실행
npm run dev

짠 !
아주 잘 나온다 !
반응형
'FRONT-END > webpack' 카테고리의 다른 글
| [Webpack] - #6 Dev Server (0) | 2022.11.16 |
|---|---|
| [Webpack] - #5 Plugin (0) | 2022.11.16 |
| [Webpack] - #4 Loader (0) | 2022.11.16 |
| [Webpack] - #3 Output (0) | 2022.11.16 |
| [Webpack] - #2 Entry (0) | 2022.11.16 |
댓글

